0. setting up a project
Buidl a project using libGDX and trascendentAR
At the end of this tutorial you will have a project set to start programming an AR application. Source code for this tutorial can be found on github. If you have any doubt regarding a file or project organization, go to the source and check it out.
Requirements
If you have used libGDX before, probably you have most of this stuff installed, you only need to download the ARToolKit native libraries. If you have never worked with libGDX, it is necessaty to have intalled install in your machine:
- JDK 7 o greater
- ADB
- Android SDK with:
- Mínimum SDK installed must be SDK Platform 4.4
- Android SDK Tools
- Android SDK Tools Platform
- Android Build Tools
- IntelliJ IDEA or Android Studio, each one has advantages over the other. For this tutorial IntelliJ IDEA will be used.
- libGDX setup app, can get it from the official website
- Configuration files, where are located the ARToolKit Native Libraries and the camera configuration file. Download it here
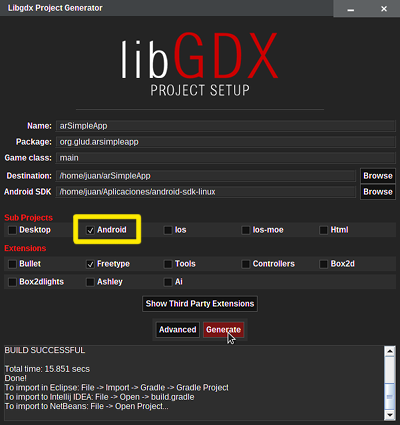
Start libGDX setup application
And enter the correpondent data, including Android SDK path, check the image as a guide. Note that only the android box is checked. I included freetypefont extension because I would like to add a cool tipography to my project, although it is not necessary. More information about this step here
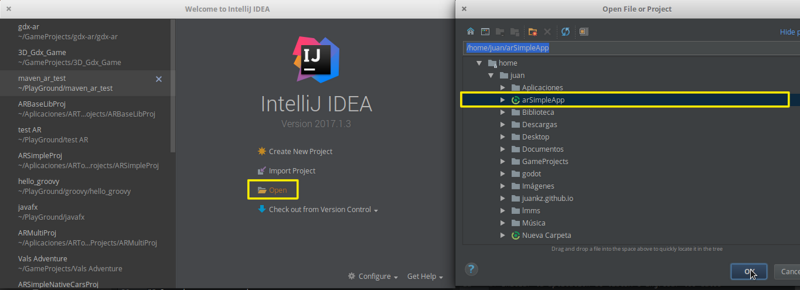
Open on IDE
Mi project was created under the directory arSimpleApp on mi user folder, the next step is open it on our favorite IDE. My favorite one is IntelliJ IDEA
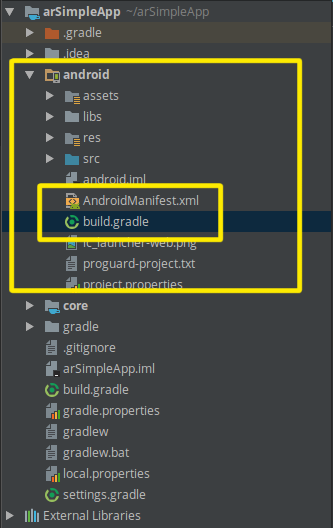
MODIFY FILES: ANDROID MANISFEST AND GRADLE
Cool! Now that we have our project open, the first thing to do is modify the minimum sdk version if it is not 15. This is done in the files AndroidManifest.xml and build.gradle located inside the android module.
In AndroidManifest.xml
<!--Add camera permission-->
<uses-permission android:name="android.permission.CAMERA" />
    <uses-feature android:name="android.hardware.camera.any" />
    <uses-feature
        android:name="android.hardware.camera"
        android:required="false" />
    <uses-feature
        android:name="android.hardware.camera.autofocus"
        android:required="false" />

<!--Modify minimum versión of android sdk-->
<uses-sdk android:minSdkVersion="15" android:targetSdkVersion="25" />

...

<!-- Add camera preferences Activity, don't touch anything else -->
<application ... >
        <activity
            ...
        ></activity>
        <activity android:name="org.artoolkit.ar.base.camera.CameraPreferencesActivity"
                  android:label="Camera Prefs"
                  android:screenOrientation="landscape"
                  android:configChanges="keyboard|keyboardHidden|orientation|screenSize">
        </activity>
    </application>
In build.gradle
defaultConfig {
    ...
    minSdkVersion 15
    ...
}
Add ARToolKit native libraries
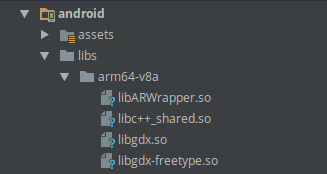
Simply extract the downloaded configuration files. Look inside the forlder Native Libs and you will see the ARToolKit libraries. Move the folders inside the directory android/libs. The end result should be similar to the image, with the files libARWrapper.so and libc++_shared.so inside each architecture: arm64-v8a, armeabi, armeabi-v7a, x86 and x86_64
Add Data folder to assets
The Data folder is very important, you will find it iside the config_files folder too, here is located the camera configuration file:camera_para.dat. Also is the place where we will add all markers files (extension .patt). Just copy it to the assets folder inside android module.
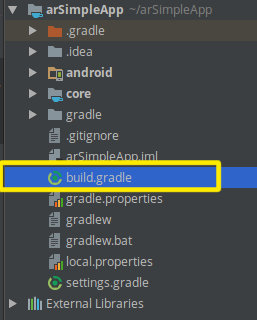
Add trascendentAR to the project
To do this, we have to edit the file build.gradle located in the root of the project (check image).
-
Inside the file, search for
project(":android")and add under dependencies the linecompile 'org.glud.trascendentAR:trascendentAR-android:1.0-beta.1' -
same way, search for
project(":core")and add under dependencies the linecompile 'org.glud.trascendentAR:trascendentAR-core:1.0-beta.1'
End result would be something like:
project(":android") {
    apply plugin: "android"

    configurations { natives }

    dependencies {
        compile project(":core")
        compile 'org.glud.trascendentAR:trascendentAR-android:1.0-beta.1'
        compile "com.badlogicgames.gdx:gdx-backend-android:$gdxVersion"
        .
        .
        .
    }
}
project(":core") {
    apply plugin: "java"

    dependencies {
        compile 'org.glud.trascendentAR:trascendentAR-core:1.0-beta.1'
        compile "com.badlogicgames.gdx:gdx:$gdxVersion"
        compile "com.badlogicgames.gdx:gdx-freetype:$gdxVersion"
    }
}
Synchronize gradle. A fail proof method is to close and reopen the project in the IDE. Probably you may see a dialog asking to Import changes in gradle. Press import